Updating my mobile code libraries from ADAL (Azure Active Directory Authentication Library) to MSAL (Microsoft Authentication Library) was supposed to be a breeze. I thought I was simply swapping out ADAL for MSAL, but nope - the universe (and Microsoft) had other plans. I got an exception thrown in my face, informing me that my once trusty mobile app could no longer be a Confidential Client.
A Look Back at Ancient History (ADAL)
I used to have app registration on Azure with secret that is also embedded into mobile code. Mobile app would chat with Azure using that secret to obtain JWT bearer token. With each API call, the server would receive token from my mobile, consult Azure and Azure would give a nod of approval if that token is valid. It is like the bouncer at a fancy nightclub, only letting in those with the right credentials. And the tokens are like VIP wristbands - they grant access to all the cool stuff.
Tomorrow Land: A Guide to Faking Confidential Client in MSAL
Microsoft has spoken, and they don't trust mobile apps to keep secrets safe. So, mobile apps can only get VIP wristbands (tokens) on behalf of the user (pop-up window asking user to enter name and password). Makes sense, right? Well, not for me. My client has a fleet of locked phones that run a single application and turn into bricks if they ever leave the building. And asking workers to login? I can tell you that I would make a lot of enemies if I would make that requirement.
It's time for plan B. My trusty locked phones were in need of a new solution, so I decided to stick with bearer token authentication, but with a twist. This time, my mobile app would get its token from the server instead of Azure. During the transition period, server would have to support not one, but two token schemes (two VIP lines). The old token from Azure for mobile apps still using ADAL, and the new, shiny token for updated apps that have already made the switch to MSAL. Yes, it takes some time to update all the phones.
Sample Code
I’m about to describe a quick prototype. For brevity’s sake I will leave out some code, but full example could be found on my GitHub: https://github.com/BigLittleEndian/MobileDeviceAuth. Now, before we dive in, let me warn you - this prototype is rough around the edges. No fancy policies or cookies here, just the bare necessities. I might add some extras later. For now, we're keeping it simple and focusing on creating and consuming tokens.
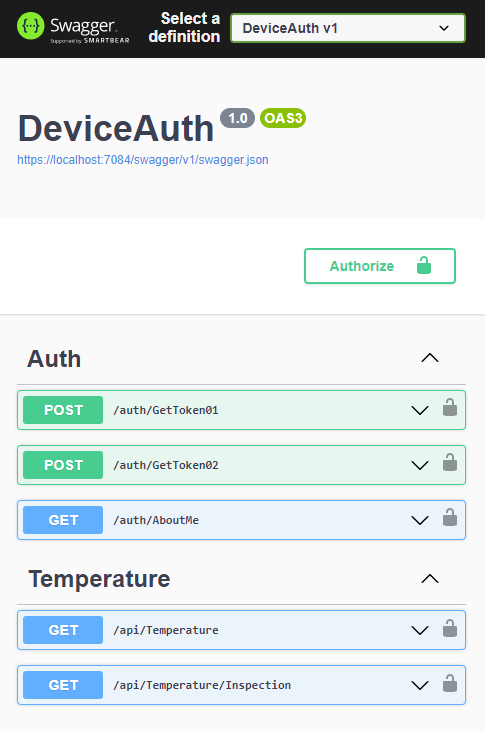
Any method you prefer to poke an API will work. Sample code is configuring Swagger to have Authorize (Login) option where you can copy and paste token, but you can use any other tool like Postman or Thunder Client in Visual Studio Code (my preferred).
Setup
In wonderful world of ASP.NET Core you are making sure that all the
instruments are in tune and playing together in harmony in Program.cs
(or Startup.cs if you are used to that). This is where the
magic begins and where you register services and create a pipeline.
We're adding Authentication and Authorization to the services and then later on to the pipeline. Who says coding can't be fun?
Star of the show is JWTToken, helper class with two
static methods. First method GetOptions() reads the
configuration file and provides all the options for the AddAuthentication.AddJwtBearer()
function. We're also creating two authentication schemes, both of
which are JWT Bearer, with the first one being the default.
Let’s take a look at the Configuration file. Where I keep my secrets is a mystery, for sure not in config file, so you shouldn’t either.
And configuration file is waiting to be read by helper method GetOptions().
This method transforms the configuration file into JwtBearerOptions,
ready to be consumed by the authentication service registration in Program.cs.
Creating Tokens
AuthController is providing two endpoints to hand out
tokens. One for each registered authentication schemes.
The JWTToken helper class is like the gatekeeper of tokens, only
allowing those with the correct secret to receive one. As an
example, we even add two extra claims to the token (serial number
and role).
public static (LoginStatus status, string? token) CreateToken(DeviceLogin deviceLogin, string configSection)
Protecting API
Authorize attribute on the top of TemperatureController
is like the bouncer of the API world, checking if you’ve got the
right authorization (token, VIP wristband) before letting you in. It
accepts two types of tokens (JWTBearer01 and JWTBearer02)
to get into the GetTemperature() party. But if you want to
see the exclusive GetInspectionData() party, you better make
sure your token has an Inspector claim on it
(note extra Authorize attribute with specified role)
Default Scheme
There's a catch.
ClaimsIdentity.IsAuthenticated() or
listing claims feature only works for the JWTBearer01 scheme.
The middleware only checks the default scheme, JWTBearer01.
So if you're using the second scheme, the system will tell you that
you're not authenticated when in reality, you are. For example, the
AboutMe() function below will return "Not Authenticated" for
the second scheme. But don't worry, the Temperature controller's
authentication and authorization still work perfectly fine for both schemes.
Conclusion
In this article, we discovered the joy of DIY token protection for our API endpoints with not just one, but multiple authentication schemes.